
SiStat process
What will you learn
How to get data from the SiStat web page.
How to pivot columns in a table
How to delete a table from a database
How to insert a table from a process into a database
Prerequisites
Access to NetiLab application with sufficient permissions.
Corresponding configuration table in database
Basic knowladge of NetFlow module
Introduction
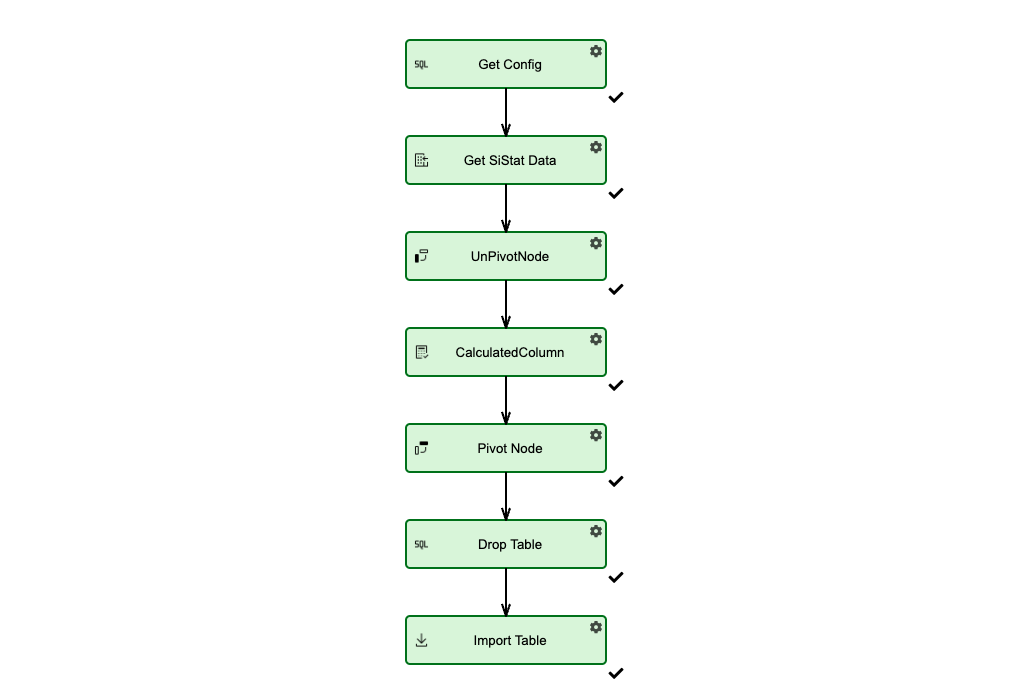
The process consists of seven nodes:
Get Config - The node type is SQL Query. This node retrieves information, with the entered sql query, from the configuration table.
Get SiStat Data - The node type is PX Reader Node. This node retrieves information from the SiStat website.
UnPivot Node - Makes unpivot procedure with selected columns.
Calculated Column - Makes some changes with the column name.
Pivot Node - Makes pivot procedure with selected columns.
Drop Table - The node type is SQL Query. This node deletes a table, with the entered sql query, from the database.
Import Table - The node type is SQL Bulk Import . This node inserts a table into the database.
Steps
For illustrative purposes, in the following steps we will use data from dataset that exists in the configuration table.
Step 1 : Get Config
Open Get Config - node type(SQL Query ) and configure it as:
{
  "connection": "<results>",
  "Timeout": 90,
  "ResultName": "pxconfig",
  "queries": [
    "select * from sistatconfig"
  ]
}
The configuration table must exist in the database!
Step 2: Get SiStat Data
Open Get SiStat Data - node type( SiStat process ) and configure it as:
{
  "Url": "https://pxweb.stat.si:443/SiStatData/api/v1/sl/Data/0400600S.px",
  "TableName": "indexCen"
}
These properties are from the configuration table.
Step 3: UnPivot Node
Open UnPivotNode and configure it as:
{
  "unpivots": [
    {
      "table": "indexCen",
      "header": [
        "ŽIVLJENJSKE POTREBŠČINE",
        "DataSetUrl"
      ],
      "depivotColumns": [],
      "attributeColumn": "DateAndMeasure",
      "numericColumn": "Value",
      "charColumn": "ValueStr",
      "deleteTable": false
    }
  ]
}
Step 4: Calculated Column
Open CalculatedColumn and configure it as:
{
  "Table": "Table_20_0",
  "CalculatedColumns": [
    {
      "Column": "Measure",
      "Expression": "TRIM(SUBSTRING(DateAndMeasure, 9, LEN(DateAndMeasure) - 8))"
    },
    {
      "Column": "Date",
      "Expression": "SUBSTRING(DateAndMeasure, 1, 8)"
    }
  ]
}
More about expressions at https://learn.microsoft.com/en-us/dotnet/api/system.data.datacolumn.expression?view=net-7.0
Step 5: Pivot Node
Open CalculatedColumn and configure it as:
{
  "table": "Table_20_0",
  "AttributeColumn": "Measure",
  "NumericColumn": "Value",
  "CharColumn": "ValueStr",
  "IDCols": [
    "ŽIVLJENJSKE POTREBŠČINE",
    "Date"
  ],
  "deleteTable": false
}
Step 6: Drop Table
Open Drop Table - node type(SQL Query ) and configure it as:
{
  "connection": "<results>",
  "Timeout": 90,
  "ResultName": "result",
  "queries": [
    "DROP TABLE IF EXISTS [dbo].[IndexCenPivot];"
  ]
}
Step 7: Import Table
Open Import Table - node type ( SQL Bulk Import ) and configure it as:
{
  "Conection": "<results>",
  "TableName": "Table_24_0",
  "ServerName": "IndexCenPivot",
  "id": null,
  "addColumns": true,
  "MissingTable": false,
  "IncludedColumns": []
}