
Sharepoint files To SQL
What will you learn
How read Sharepoint files with NetFlow.
How to parse and transform those files.
How to save its data into SQL Server database and move Sharepoint files at the end.
After completing this tutorial you will have an automatic (or on demand) process that will read Sharepoint folder, parse the content of files and store it into SQL Server database. Processed files will also be moved so that they wont be processed again on another instance. In advanced section we will use python script to parse files.
Prerequisites
Basic knowledge of NetFlow and how to create processes.
Basic knowledge of Sharepoint and SQL Server
Introduction
It is often the case where multiple users in an organization create and modify files in a shared Sharepoint site/library. Those files contains valuable data which most of the time needs to be either reported, analyzed or simply searched.
With NetFlow we solve this problem by automatically reading and parsing Sharepoint files and then storing it into Data Warehouse.
Steps
Step 1
Create a + new process (choose Blank Process) and add Sharepoint Connector (to do) as a first node. Configure
Sharepoint site and library from where you want to read the files.
File Filter to filter files that you don't want to read.
Number of taken files to set up the number of files that will be processed in one instance
If Sharepoint sites are not loaded then your Workspace does not have Sharepoint included. You can follow (todo sharepoint configuration) to set up Sharepoint inside your workspace.
Step 2
Add CSV Parser Node and connect it with previous node. In configuration set FilePath to @sharepointFiles. This will tell the Csv Parser node to take files from previously ingest Sharepoint Files. Configure other properties according to the csv file you want to parse.
Step 3
Add SQL Bulk Import node and connect it with previous node. Select the connection to you Data Warehouse and set the name of the table where you want to store the data.
Step 4
Add (Sharepoint FIle mover node) and connect it with previous one. Configure All for File Types and specify Destination Path as Processed.
Hint: Now reconfigure first node and insert regex negative look up in order to avoid reading files from Processed folder.
Run and test the process
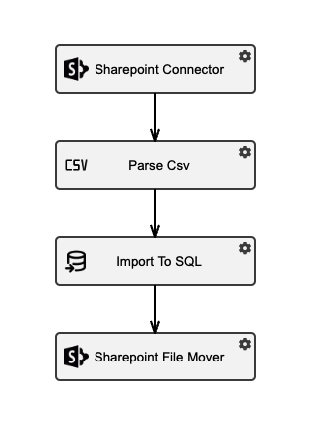
Schema of created process.
Save the process and run it. If everything was configured properly process should execute successfully. Verify that SQL table was created (or new rows inserted) and that processed file was moved to corresponding directory.
You can open instance in Table view and check details from Csv Parser node. For each processed file you should see an indicator that was successfully processed or error message if this is not the case.
After you are done you can create this process as a Template.
Advanced (Python parsing)
If the files you want to process are more complicated that cannot be parsed by built in connectors, then you can simply use Python Parser Multiple Node node instead. All you have to do is write a python script that parses given files (by following Python Scripting article).
Then replace the Csv parser node from above with Python Parser Node. Select @sharepointFiles as File Path.